
 how-to
Prevent Electrical Fires in Old Homes: 2026 Guide
Table of Contents
- Common Causes of Electrical Fires in Older Homes
- Signs of Outdated Electrical Wiring You Should Never Ignore
- Your Electrical Safety Inspection Checklist for Old Homes
- Upgrading Circuit Breakers and Electrical Panels
- Safe Use of Extension Cords, Power Strips, and Outlets
- Cost of Whole House Rewiring and Insurance Implications
- DIY vs. Professional Scope: What You Can and Cannot Do
- When to Call a Licensed Electrician
- Frequently Asked Questions
Last Updated: September 10, 2026
Common Causes of Electrical Fires in Older Homes
Older homes hide their worst electrical problems behind finished walls. According to the U.S. Fire Administration's residential fire loss data, electrical failures remain a leading cause of home fires, and aging housing stock carries disproportionate risk. In older houses, common failures include insulation that crumbles at a touch, outlets pushed past their amperage rating, and cords powering things they were never built to carry. Learning how to prevent electrical fires in old homes starts with understanding where the danger actually lives.
Wiring Insulation Degradation and Heat Buildup
Wiring insulation is the rubber or plastic jacket that separates a live conductor from everything around it. When that jacket dries out, cracks, or turns brittle, current can arc to nearby wood framing. Heat buildup accelerates the process: every loose connection raises resistance, and resistance generates thermal damage at the terminal. In practice, this means a wire that tests fine in January can fail in July when a window air conditioner pushes continuous load through it.
Overloaded Outlets and Frayed Cords
An overloaded outlet is any receptacle asked to deliver more current than its circuit, or its own contacts, can safely handle. Older homes typically ran one or two circuits per floor, so a single 15-amp circuit may feed every bedroom. Add a space heater, a window unit, and a charging station, and you have a recipe for heat buildup inside the wall. Frayed cords make it worse: a damaged cord can short circuit against a combustible surface long before the breaker ever trips.
Signs of Outdated Electrical Wiring You Should Never Ignore
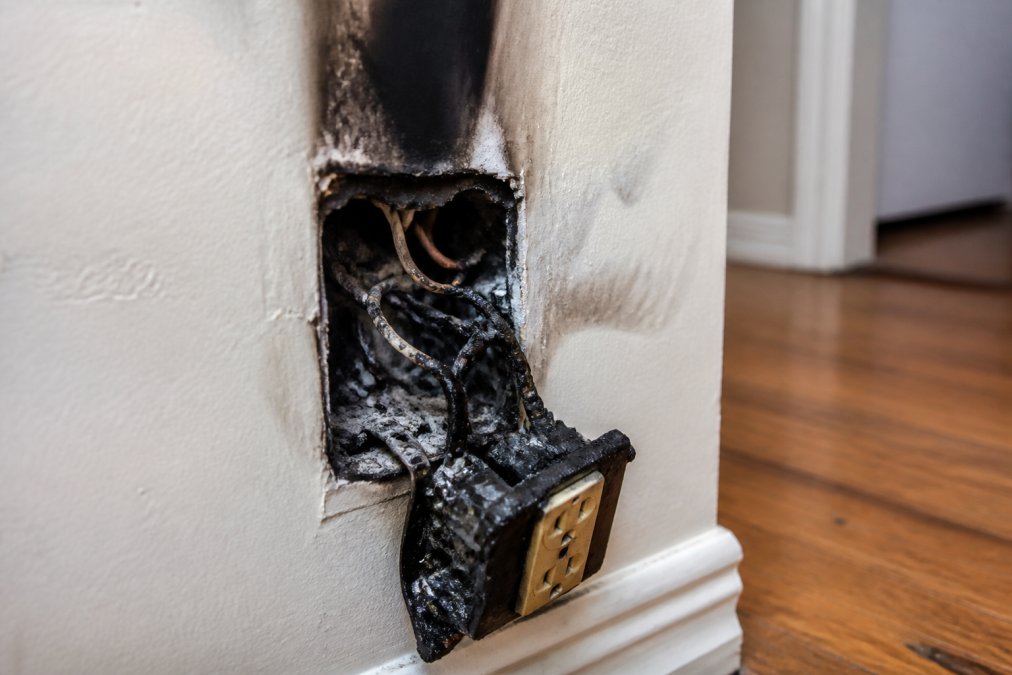
The clearest signs of outdated electrical wiring are discolored wall plates, warm receptacles, flickering lights, burning smells, and breakers that trip repeatedly. Any one of these justifies an inspection; two or more means you should stop using that circuit until an electrician sees it.
What most guides miss is that the warning signs arrive in a specific order. Loose-fitting plugs come first, then discoloration, then heat you can feel. By the time you smell burning insulation, the wiring degradation has been underway for years. The order matters because it tells you how far the damage has progressed, a loose plug is a nuisance, but heat at the plate means the conductor or terminal is already failing.
Knob-and-Tube Wiring Identification
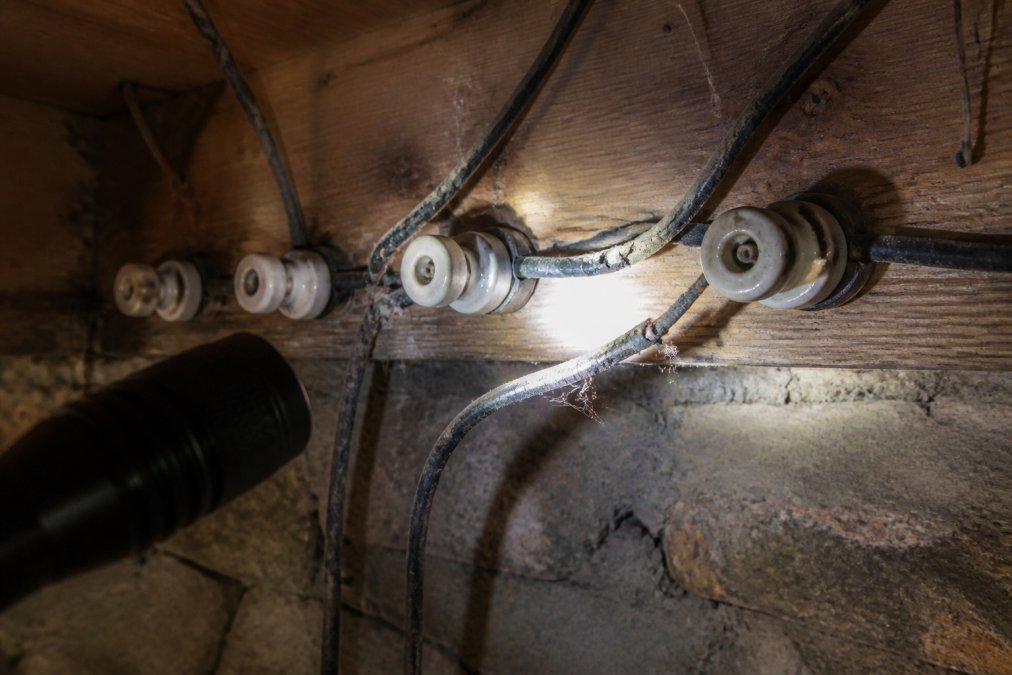
Knob-and-tube wiring is an early electrical system that runs single conductors through ceramic knobs and tubes instead of cables. It was the standard method from roughly the 1880s through the 1940s, so any home built or rewired before the mid-century is a candidate (nps.gov). You can identify it in an unfinished basement or attic by the white ceramic spools and the absence of a ground wire. Look for these specific markers:
- Ceramic knobs, smooth, spool-shaped insulators nailed to joists, with a single wire wrapped around each one
- Ceramic tubes, short, hollow cylinders set into drilled holes where a wire passes through a framing member
- No grounding conductor, only two wires per run (hot and neutral), with no bare copper ground
- Cloth or rubber insulation, often brittle, crumbly, or wrapped in friction tape rather than modern thermoplastic
- Splices outside boxes, connections made in open air and taped, rather than enclosed in a junction box
Knob-and-tube itself isn't automatically illegal, and the National Electrical Code does not require its removal. But it has no grounding conductor, and its insulation becomes brittle with age. It also sits poorly with modern insulation: blown-in or foam insulation traps heat against the conductors, which the original design never anticipated. The conductors were sized for the loads of their era, and knob-and-tube circuits were typically fused at 15 or 20 amps with no equipment ground. If you find it, do not bury it under new insulation, and do not assume a home inspector's "functional" note means it is safe to load heavily.
Aluminum Wiring Remediation
Aluminum branch-circuit wiring was installed in many homes during the 1960s and 1970s, when copper prices spiked and builders switched to aluminum for 15- and 20-amp branch circuits. It expands and contracts more than copper, so connections loosen over time, and loose aluminum connections oxidize and overheat. The U.S. Consumer Product Safety Commission has documented that homes with aluminum branch-circuit wiring are at elevated risk of connection failures compared to copper (cpsc.gov).
You can often identify aluminum wiring by looking at the cable jacket in an unfinished area, it is frequently marked "AL" or "ALUMINUM", or by checking the exposed conductor at a receptacle or switch, where the metal is silver-colored rather than the reddish tone of copper. Do not confuse this with tinned copper, which is copper with a silver coating; a magnet test and a close look at the cut end will distinguish them.
Remediation options include:
- Re-terminating every device with approved connectors and antioxidant paste, using a listed pigtail or a CO/ALR-rated device
- Replacing the affected circuits in copper, which is the most thorough but most invasive route
- Whole-home rewiring if the aluminum runs throughout the branch circuits
This is not a DIY job. A licensed electrician should assess the full branch circuit before you decide which route makes sense, and any remediation should be documented for your records and your insurer.
Your Electrical Safety Inspection Checklist for Old Homes
An electrical safety inspection checklist for old homes should cover the panel, every receptacle, the grounding system, and the loads on each circuit. Walk through this in order:
- Confirm the electrical panel has no rust, scorch marks, or double-tapped breakers
- Test every ground fault circuit interrupter and arc fault circuit interrupter
- Check all wall plates for cracks, discoloration, or heat
- Verify tamper-resistant receptacles in rooms used by children
- Inspect each major appliance's dedicated circuit and cord
- Confirm at least one working smoke alarm on every level and outside each sleeping area
- Locate a fire extinguisher rated for electrical fires within reach of the kitchen
- Note any knob-and-tube or aluminum wiring for professional review
| Finding | Risk Level | Recommended Action |
|---|---|---|
| Warm or discolored outlet | High | Stop using circuit; call an electrician |
| Breaker trips repeatedly | High | Do not reset; diagnose the load first |
| Two-prong outlets only | Medium | Evaluate grounding options |
| Frayed appliance cord | Medium | Replace cord or appliance |
| Missing smoke alarm | High | Install immediately |
Upgrading Circuit Breakers and Electrical Panels
Upgrading a circuit breaker or electrical panel means replacing equipment that can no longer carry the home's electrical load safely. Older panels may lack the amperage headroom for modern appliances, and some legacy panels are known to fail to trip under fault conditions. An upgrade typically involves a new panel, updated grounding, and arc fault circuit interrupter protection on bedroom and living-area circuits. This is one of the highest-value fire prevention investments an older home can make.
Safe Use of Extension Cords, Power Strips, and Outlets
Extension cords are temporary devices, not permanent wiring. Running a cord under a rug, through a doorway, or behind baseboard trim traps heat and hides damage until it's too late. Power strips should never be daisy-chained, and they should never carry a major appliance. A refrigerator, space heater, or window air conditioner belongs on its own dedicated circuit. Tamper-resistant receptacles are a worthwhile upgrade in any home with children, and they cost little more than standard devices.
Cost of Whole House Rewiring and Insurance Implications
The cost of whole house rewiring depends on square footage, wall access, and whether the panel needs replacement at the same time. Because pricing varies so widely by property, we quote every rewiring project after an on-site assessment rather than publishing a flat figure. What drives the number is not the wire itself, it is the labor of getting to it. A home with an unfinished basement and attic offers easy access; a finished two-story with plaster walls and no crawlspace does not. Expect the scope to include new cable, new boxes, new devices, patching and painting, and often a panel upgrade, and expect the total to scale with the number of circuits rather than the square footage alone.
A few cost drivers worth understanding before you get bids:
- Access, unfinished basement or attic runs are far cheaper than fishing wire through finished walls
- Wall material, plaster and lath is slower to open and repair than drywall
- Circuit count, a kitchen remodel or a new HVAC load can force additional circuits beyond a straight replacement
- Panel condition, if the existing panel cannot accept the new circuits or lacks the required breaker spaces, it gets replaced too
- Permits and inspection, most jurisdictions require a permit for a rewire, and the inspection is part of the cost
Get at least three itemized bids, and ask each contractor to separate labor, materials, patching, and permit fees so you can compare like for like. A bid that is dramatically lower than the others usually means patching, permits, or panel work were left out.
How Wiring Affects Insurance Eligibility and Premiums
What many homeowners don't realize is the insurance angle. Insurers underwrite on risk, and older electrical systems are a known risk category. During underwriting, a carrier may ask about the age of the roof, the plumbing, and the electrical system, and some will ask specifically whether the home has knob-and-tube or aluminum branch-circuit wiring. A home with either may face higher premiums, a surcharge, or coverage conditions, and in some cases a carrier will decline to write the policy until the wiring is remediated.
A few practical points:
- Disclose accurately. Misrepresenting the wiring type on an application can give the insurer grounds to deny a claim later.
- Document your upgrades. Keep the electrician's invoice, the permit, and the inspection sign-off. Insurers often accept documented remediation as evidence the risk has been addressed.
- Ask before you buy. If you are shopping for coverage, ask the agent directly what documentation they require for a home with older wiring, and whether a recent inspection changes the rate.
- A four-point inspection is commonly requested for older homes in some markets; it covers the electrical system along with the roof, plumbing, and HVAC, and its findings can affect insurability.
If your home is over 40 years old and has never had a professional electrical inspection, schedule one before you add another appliance. That inspection is also the document your insurer is most likely to ask for.
DIY vs. Professional Scope: What You Can and Cannot Do
Replacing a wall plate, swapping a light fixture on a de-energized circuit, or resetting a breaker after removing the offending load are reasonable DIY tasks. Anything involving the panel, new circuits, grounding, or aluminum wiring remediation belongs to a licensed electrician. The line isn't about difficulty; it's about liability and code. Unpermitted electrical work can fail a home inspection and complicate an insurance claim.
When to Call a Licensed Electrician
Call a licensed electrician immediately if you smell burning, see scorch marks, feel heat at a receptacle, or have a breaker that trips repeatedly. These are not maintenance items; they are active hazards. Mister Volts provides residential and commercial electrical services, including panel upgrades, breaker replacement, and full building wiring, with a commitment to code-compliant work and competitive quotes. If your home is over 40 years old and has never had a professional electrical inspection, schedule one before you add another appliance.
Frequently Asked Questions
What is the number one cause of electrical fires in homes?
The leading cause is faulty wiring, including outdated systems like knob-and-tube or aluminum wiring that degrade over time. In older homes, worn insulation, loose connections, and overloaded circuits are common culprits. Regular inspections by a licensed electrician can identify these risks early and prevent fires.
What are the warning signs of faulty wiring in an old house?
Watch for flickering lights, frequently tripped circuit breakers, a burning smell near outlets, and discolored wall plates. These signs indicate potential overheating or short circuits. If you notice any, schedule an electrical safety inspection immediately to avoid fire hazards.
Are knob-and-tube wiring systems a fire hazard?
Yes, knob-and-tube wiring is a fire hazard because the insulation becomes brittle over time and lacks a ground wire. It cannot handle modern electrical loads, leading to overheating.
How often should electrical systems in older homes be inspected?
Annual checks are wise if you notice any warning signs. A licensed electrician can assess your system and provide a detailed safety report.
Older homes demand more electrical attention than newer construction, and the risks compound quietly until they don't. Mister Volts brings licensed electricians, code-compliant installations, and a full range of services from minor repairs to complete rewiring. Get started with Mister Volts and give your home an electrical system you can trust.